Posts

Showing posts from February, 2020

windows service automatic delayed start

Automatic (Delayed Start), where your service starts 1-2 minutes after all Automatic services have been launched, may also be acceptable. Start the Services Control Panel application . Find your service in the list and double-click it to show its properties. Ensure that the Startup type field is set to Automatic. Note that Automatic (Delayed Start), where your service starts 1-2 minutes after all Automatic services have been launched.

Fixed “Unable to locate package” error in Ubuntu 18.04 on Windows 10

Try running sudo apt update. If that doesn't fix it, you might have an improperly configured /etc/apt/sources.list file.

Running ssh-agent on Windows

First configure OpenSSH Authentication Agent service to automatically start. To have SSH agent to automatically start with Windows, you can run Set-Service ssh-agent -StartupType Automatic on a super-user powershell prompt. Or you can start it manually every time when opening your powershell for the first time: Start-Service ssh-agent. After that, you need to ssh-add C:\path\to\your\ssh\key\id_rsa only once. After that, everytime the ssh-agent is started, the key will be there. You can check with ssh-add -l.

Controlled Access Folder - protect Windows system files

According to Microsoft, “Controlled folder access helps you protect valuable data from malicious apps and threats, such as ransomware“. When you use Controlled Access Folder, Microsoft is offering “All apps (any executable file, including .exe, .scr, .dll files and others) are assessed by Windows Defender Antivirus, which then determines if the app is malicious or safe. If the app is determined to be malicious or suspicious, then it will not be allowed to make changes to any files in any protected folder”. By default, Microsoft adding the system files under this controlled Access Folder, but you can add your own files and folder to this protected folder to secure from hackers.

Get My Public IP Address using Linux curl Command

curl ifconfig.me

Alpine makes a great docker container

Alpine is so small and optimized to be run in RAM. It also might make a good controller for several docker containers. Alpine Linux is a Linux distribution based on musl and BusyBox, designed for security, simplicity, and resource efficiency. It uses a hardened kernel and compiles all user-space binaries as position-independent executables with stack-smashing protection. Because of its small size, it is heavily used in containers providing quick boot-up times.

What is disk spanning

Disk spanning combines multiple drives and displays them in the operating system as one drive. For example, four 20-GB hard drives that are spanned appear as one 80-GB drive in the operating system. Disk spanning alone provides no data protection. It is a logical grouping to increase the capacity of the disk.

Docker multi-stage builds

With multi-stage builds, you use multiple FROM statements in your Dockerfile. Each FROM instruction can use a different base, and each of them begins a new stage of the build. You can selectively copy artifacts from one stage to another, leaving behind everything you don’t want in the final image.

Kite Python Plugin for Visual Studio Code

Kite is an AI-powered programming assistant that helps you write Python code inside Visual Studio Code. Kite helps you write code faster by showing you the right information at the right time. Learn more about how Kite heightens VS Code's capabilities at https://kite.com/integrations/vs-code/ . At a high level, Kite provides you with: 🧠 Line-of-Code Completions powered by machine learning models trained on the entire open source code universe 📝 Intelligent Snippets that automatically provide context-relevant code snippets for your function calls 🔍 Instant documentation for the symbol underneath your cursor so you save time searching for Python docs

What is PEP 8?

PEP 8 is Python's style guide.  It's a set of rules for how to format your Python code to maximize its readability. Writing code to a specification helps to make large code bases, with lots of writers, more uniform and predictable, too.  PEP is actually an acronym that stands for Python Enhancement Proposal.

How is Python interpreted?

Python is basically an interpreted language. An interpreted language is one, in which, the translation of high level Source Code to low level Machine code is done by an interpreter, a kind of translator. The interpreter reads the source code line by line, and executes it along the way.

How is memory managed in Python

The Python memory manager manages chunks of memory called “Blocks”. A collection of blocks of the same size makes up the “Pool”. Pools are created on Arenas, chunks of 256kB memory allocated on heap=64 pools. If the objects get destroyed, the memory manager fills this space with a new object of the same size.

In Python, lambda expressions are utilized to construct anonymous functions.

To do so, you will use the lambda keyword (just as you use def to define normal functions). Every anonymous function you define in Python will have 3 essential parts: The lambda keyword. The parameters (or bound variables), and The function body. Example: adder = lambda x, y: x + y print (adder (8, 88)) $python3 main.py 96

What are generators in Python?

Generator functions allow you to declare a function that behaves like an iterator, i.e. it can be used in a for loop.

What is the use of the split function in Python?

This is the opposite of concatenation which merges or combines strings into one. To do this, you use the split function. What it does is split or breakup a string and add the data to a string array using a defined separator. If no separator is defined when you call upon the function, whitespace will be used by default.

How do you convert a number to a string in Python

We can convert numbers to strings through using the str() method. We'll pass either a number or a variable into the parentheses of the method and then that numeric value will be converted into a string value. The quotes around the number 18 signify that the number is no longer an integer but is now a string value.

Data structures and algorithms resources

My favorite free courses to learn data structures and algorithms in depth Cracking the Coding Interview: 150 Programming Questions and Solutions Programming Interviews For Dummies 5 Free Data Structure and Algorithms Books in Java Programming

List docker James domains

$ docker exec james java -jar /root/james-cli.jar -h 127.0.0.1 -p 9999 listdomains james.local james.linagora.com localhost 172.18.0.7 ListDomains command executed sucessfully in 318 ms.

Docker Compose is used to run multiple containers as a single service.

For example, suppose you had an application which required NGNIX and MySQL, you could create one file which would start both the containers as a service without the need to start each one separately. https://github.com/docker/compose/ Using Compose is basically a three-step process. Define your app's environment with a Dockerfile so it can be reproduced anywhere. Define the services that make up your app in docker-compose.yml so they can be run together in an isolated environment. Lastly, run docker-compose up and Compose will start and run your entire app.

Run as many docker RUN commands as possible in the same layer

Shell Format The shell format looks as follows: RUN executable param1 param2 Exec Format The exec format looks as follows: RUN ["executable", "param1", "param2"] The docker RUN command can use either of these forms. When running in shell form, a backslash must be used to continue the RUN instruction onto the next line. To reduce the number of layers produced it’s recommended to run as many RUN commands as possible in the same layer, for example like so: RUN mkdir -p /opt/test/config && \  mkdir -p /opt/test/lib There is no functional reason to have a layer containing only one of these commands, so they are merged to reduce layer complexity.

There are two leading open source tools for database version control: Liquibase and Flyway.

Both Liquibase and Flyway have become popular options for versioning and organizing database changes, deploying changes when they need to be deployed, and tracking what's been deployed.

The maximum transmission unit (MTU)

The maximum transmission unit (MTU) of a network connection is the size, in bytes, of the largest permissible packet that can be passed over the connection. The larger the MTU of a connection, the more data that can be passed in a single packet. Ethernet packets consist of the frame, or the actual data you are sending, and the network overhead information that surrounds it. Ethernet frames can come in different formats, and the most common format is the standard Ethernet v2 frame format. It supports 1500 MTU, which is the largest Ethernet packet size supported over most of the Internet.

Sleep tight with night light

Rest your weary eyes at night and make it easier to get to sleep. Select action center  > Night light to go easy on your eyes with warmer colors. https://www.microsoft.com/en-ca/tips/home/personalize-your-pc?ocid=FY2002NL_ema_rmc_win_50266_2056388_14557_en-ca_HER&zuid=10635CF5E4B4585D0871D3FC0A0A3BFCAF#nightlight

Automating the Amazon EBS Snapshot Lifecycle

You can use Amazon Data Lifecycle Manager to automate the creation, retention, and deletion of snapshots taken to back up your Amazon EBS volumes. Automating snapshot management helps you to: Protect valuable data by enforcing a regular backup schedule. Retain backups as required by auditors or internal compliance. Reduce storage costs by deleting outdated backups. Combined with the monitoring features of Amazon CloudWatch Events and AWS CloudTrail, Amazon Data Lifecycle Manager provides a complete backup solution for EBS volumes at no additional cost.

Enable the Extra Packages for Enterprise Linux (EPEL) repository

Modify /etc/yum.repos.d/epel.repo. Under the section marked [epel] , change enabled=0 to enabled=1. To temporarily enable the EPEL repository, use the yum command line option --enablerepo=epel.

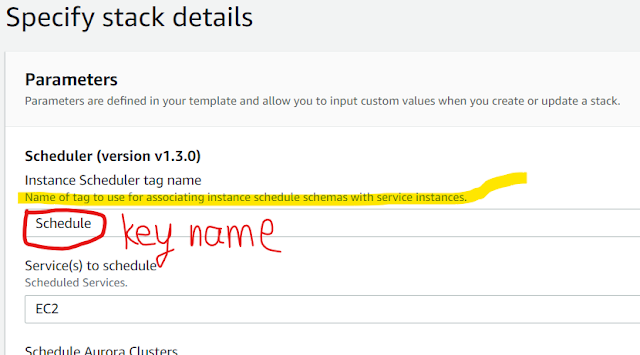
Example: How to Use AWS Instance Scheduler to Automatically Start and Stop EC2 instances

Image
Go to your Amazon DynamoDB console and click Tables. There will be 2 tables, <stack-name>-ConfigTable and <stack-name>-StateTable. We will make some changes only on ConfigTable. You can find a lot of sampe config inside. Or you can go from CloudFormation Stacks Scheduler Created by you from  Resources, click ConfigTable. First, we need to create a Period that defines the time(s) the instance should run. Pick one of the sample Period and click Action > Duplicate. A popup will appear and you can change everything you need like (more options in the docs): begintime, instance start time (24-hour format), description, endtime, instance stop time (24-hour format), name, period name (need to be unique), weekdays, days of the week the instance will run. then click Save. Then create a Schedule, that specify when instances should run. Pick one of the sample schedule and click Action > Duplicate. A popup will appear and you can change everything you need like (more options in

Java Scanner class

One popular way to read input from Java stdin is by using the  Scanner class  and specifying the  Input Stream  as  System.in . For example: Scanner scanner = new Scanner ( System . in ); String myString = scanner . next (); int myInt = scanner . nextInt (); scanner . close (); System . out . println ( "myString is: " + myString ); System . out . println ( "myInt is: " + myInt );

Emails bounces are categorised into two types

A hard/permanent bounce: This indicates that there exists a permanent reason for the email not to get delivered. These are valid bounces, and can be due to the non-existence of the email address, an invalid domain name (DNS lookup failure), or the email provider blacklisting the sender/recipient email address. A soft/temporary bounce: This can occur due to various reasons at the sender or recipient level. It can evolve due to a network failure, the recipient mailbox being full (quota-exceeded), the recipient having turned on a vacation reply, the local Message Transfer Agent (MTA) not responding or being badly configured, and a whole lot of other reasons. Such bounces cannot be used to determine the status of a failing recipient, and therefore need to be sorted out effectively from our bounce processing.

The functions that have Codelenses are those that use AWS Lambda-function handler syntax.

CodeLenses A handler is a function that Lambda calls to start execution of a Lambda function. These CodeLenses enable you to locally run or debug the corresponding serverless application. CodeLens actions in the Toolkit include: Configure, for specifying function configurations such as an event payload and environment variable overrides. Run Locally, for running the function without debugging. Debug Locally, for running the function with debugging.

You can use the AWS Toolkit for VS Code to interact with several AWS resources in various ways.

These include the following: AWS serverless applications AWS Lambda functions AWS CloudFormation stacks AWS Cloud Development Kit (AWS CDK) applications Amazon EventBridge schemas Amazon Elastic Container Service (Amazon ECS) task definition files

Run AWS SAM CLI from Docker

AWS-SAM-CLI-on-docker

What vim color schemes are installed?

$ cd /usr/share/vim/vim81/colors/ $ ls *.vim -l | awk '{print $9}' blue.vim darkblue.vim default.vim delek.vim desert.vim elflord.vim evening.vim industry.vim koehler.vim morning.vim murphy.vim pablo.vim peachpuff.vim ron.vim shine.vim slate.vim torte.vim zellner.vim

Fixed shared library: libcrypt.so.1: cannot open shared object file: No such file or directory

$dnf whatprovides '*/libcrypt.so.1' $sudo dnf install libxcrypt-compat

Fixed dig command not found on Fedora and Centos

      dnf provides *bin/dig       dnf -y install bind-utils

CLI tool to build, test, debug, and deploy Serverless applications using AWS SAM

The AWS Serverless Application Model (SAM) is an open-source framework for building serverless applications. It provides shorthand syntax to express functions, APIs, databases, and event source mappings. With just a few lines of configuration, you can define the application you want and model it. https://github.com/awslabs/aws-sam-cli

Installing Docker on Amazon Linux 2

Update the installed packages and package cache on your instance. sudo yum update -y Install the most recent Docker Community Edition package. sudo amazon-linux-extras install docker Start the Docker service. sudo service docker start Add the ec2-user to the docker group so you can execute Docker commands without using sudo. sudo usermod -a -G docker ec2-user Log out and log back in again to pick up the new docker group permissions. You can accomplish this by closing your current SSH terminal window and reconnecting to your instance in a new one. Your new SSH session will have the appropriate docker group permissions. Verify that the ec2-user can run Docker commands without sudo. docker ps You should see the following output, showing Docker is installed and running:    CONTAINER ID        IMAGE               COMMAND             CREATED             STATUS              PORTS               NAMES                 Note In some cases, you may need to reboot your instance to provide permission

AWS CLI Configuration Variables

Configuration values for the AWS CLI can come from several sources:        o As a command line option        o As an environment variable        o As a value in the AWS CLI config file        o As a value in the AWS Shared Credential file        Some  options  are  only available  in the AWS CLI config.  This topic        guide covers all the configuration variables available in the AWS CLI.        Note that if you are just looking to get the minimum required  configu-        ration  to  run the AWS CLI, we recommend running aws configure, which        will prompt you for the necessary configuration values. CONFIG FILE FORMAT        The AWS CLI config file, which defaults to ~/.aws/config has the following format:   [default]   aws_access_key_id=foo   aws_secret_access_key=bar   region=us-west-2        The  default section refers to the configuration values for the default        profile. You can create profiles, which represent  logical  groups  of        configuration. Prof

Pushing the container to Docker Hub

docker commit -m "your comment" -a "Your FULL NAME" docker-name-or-id your-Docker-Hub-user-name/docker-image-name:latest Next we need to login to Docker Hub with the command: docker login docker push your-Docker-Hub-user-name/docker-image-name

Run AWS CLI from Docker

$ alias aws='docker run --rm -tiv $HOME/.aws:/root/.aws -v $(pwd):/aws i88ca/aws-cli aws' $ aws --version aws-cli/2.0.1 Python/3.7.3 Linux/4.14.154-128.181.amzn2.x86_64 botocore/2.0.0dev5 https://github.com/i88ca/aws-cli

Fixed: docker IPv4 forwarding is disabled

Problem: $ aws help WARNING: IPv4 forwarding is disabled. Networking will not work. Solution: # echo "net.ipv4.ip_forward=1"  >> /etc/sysctl.conf # systemctl restart network # sysctl net.ipv4.ip_forward net.ipv4.ip_forward = 1

Checking Container Logs

When a container is either running in the background (it has been forked with `docker run -d`), or it has exited early, it can be useful to see the container logs. docker logs <container-id/alias> This will print out the current content of the container logs to the terminal. To follow these logs, add the -f parameter. To see timestamps with the logs, use the -t parameter.

Docker Networking

When running a container, the -p option maps a port on the host to a port on the container being run. If no port mappings are specified the container is still accessible, but only from the host running the Docker daemon. Docker handles a collection of networks; the default one is named ‘bridge’, and will allow containers running on the same machine to communicate. You can inspect this network by running the following command: docker network inspect bridge This will print out the details of the bridge network, and within that the IPs of containers running on it. You can read more about Docker networking here: https://docs.docker.com/network/.

GPG to generate password

gpg --gen-random -a 1 22 PQq/ojKuXUSRmy41yJ3aUVij5I3MeQ==

Theia is a platform to develop Cloud & Desktop IDEs with modern web technologies.

Cloud & Desktop IDE Eclipse Theia is an extensible platform to develop multi-language Cloud & Desktop IDEs with state-of-the-art web technologies. View on GitHub Try in Gitpod   →

Certbot is a free and open-source utility mainly used for managing SSL/TLS certificates from the Let’s Encrypt certificate authority.

Installing Certbot Most Linux distributions provide certbot in their official repositories. Below are installation instructions for widely-used platforms. Debian and Ubuntu: apt update apt install -y certbot Fedora and CentOS: dnf install -y certbot Or yum install -y certbot    Arch Linux: pacman -Sy certbot FreeBSD: pkg install py36-certbot OpenBSD 6.0 and later: pkg_add certbot MacOS (homebrew required): brew install letsencrypt

Let's Encrypt free SSL/TLS certificates

Let's Encrypt is an automated and open certificate authority (CA) operated by the Internet Security Research Group (ISRG) and founded by the Electronic Frontier Foundation (EFF), the Mozilla Foundation, and others.  It provides free SSL/TLS certificates which are commonly used to encrypt communications for security and privacy purposes, the most notable use case being HTTPS. Let's Encrypt relies on the ACME (Automatic Certificate Management Environment) protocol to issue, revoke and renew certificates.

Groovy is a Java-syntax-compatible, object-oriented language that runs on the Java Virtual Machine (JVM).

Groovy is both a static and dynamic language. It has features that are similar to Python, Ruby and Smalltalk. It can be used as both a programming language and a scripting language. Because it compiles to the JVM, it interoperates seamlessly with other Java code libraries. Unlike Java, Groovy supports domain-specific languages (DSLs) and meta-programming.

How to find large / big files in Linux

$ find . -type f -size +10000k Only certain names: $ find . -name "email.2015*" -type f -size +10000k

How to solve MySQL error: Last_IO_Error Got a packet bigger than 'max_allowed_packet' bytes

To solve this problem, we need to change max_allowed_packet=4096M ( or some other value suitable for you) in /etc/my.cnf file. To make sure we set it correctly, run select @@max_allowed_packet; If you unfortunately put more than 2 lines of "max_allowed_packet= " in the configuration file, the last one takes effect.

Amazon DynamoDB vs Amazon SimpleDB

Both DynamoDB and SimpleDB are non-relational databases that remove the work of database administration. Amazon DynamoDB focuses on providing seamless scalability and fast, predictable performance. It runs on solid state disks (SSDs) for low-latency response times, and there are no limits on the request capacity or storage size for a given table. This is because Amazon DynamoDB automatically partitions your data and workload over a sufficient number of servers to meet the scale requirements you provide. In contrast, a table in Amazon SimpleDB has a strict storage limitation of 10 GB and is limited in the request capacity it can achieve (typically under 25 writes/second); it is up to you to manage the partitioning and re-partitioning of your data over additional SimpleDB tables if you need additional scale. While SimpleDB has scaling limitations, it may be a good fit for smaller workloads that require query flexibility. Amazon SimpleDB automatically indexes all item attributes and thus

Installing wireless driver for dell vostro 3500 on Fedora

Wireless  won’t  work by default for fedora on vostro 3500, need to install kmod-wl package from  rpmfusion  non free repository.

How to enable / disable a service with chkconfig

The  chkconfig  utility is a command-line tool that allows you to specify in which runlevel to start a selected service, as well as to list all available services along with their current setting. Note that with the exception of listing, you must have superuser privileges to use this command. ⁠Listing the Services To display a list of system services (services from the  /etc/rc.d/init.d/  directory, as well as the services controlled by  xinetd ), either type  chkconfig --list , or use  chkconfig  with no additional arguments. You will be presented with an output similar to the following: ~]# chkconfig --list NetworkManager 0:off 1:off 2:on 3:on 4:on 5:on 6:off abrtd 0:off 1:off 2:off 3:on 4:off 5:on 6:off acpid 0:off 1:off 2:on 3:on 4:on 5:on 6:off anamon 0:off 1:off 2:off 3:off 4:off 5:off 6:off atd 0:off 1:off 2:off 3:on 4:on 5:on 6:off auditd 0:off 1:off 2